Blog
How To
Organize Camera On Invid Elevate App
Organising cameras in the Invid Elevate app ensures that
your surveillance system is efficient, easy to monitor,
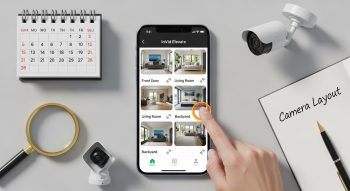
Organising cameras in the Invid Elevate app ensures that your surveillance system is efficient, easy to monitor, and fully optimised. Whether you have a few cameras at home or dozens across multiple locations, proper organisation allows you to quickly access live feeds, playback recordings, and monitor critical areas without confusion. This guide covers every aspect of camera organisation in detail.
1. Understanding Camera Organization in Invid Elevate
The Invid Elevate app is designed to manage multiple IP cameras, DVRs, and NVRs from a single interface. Key features for organisation include:
-
Camera Groups: Arrange cameras by location or purpose.
-
Favourites: Quickly access important cameras.
-
Renaming: Easily identify cameras by custom names.
-
Live View Layouts: Customise how multiple feeds appear on screen.
-
Device Organisation: Manage multiple DVRs/NVRs in one app.
Properly using these features ensures you can monitor your premises effectively and reduces the risk of missing critical events.
2. Adding Cameras to the Invid Elevate App
Before organising, ensure your cameras are added:
-
Open Invid Elevate.
-
Tap ‘Add Device’ or ‘+’.
-
Select IP Camera, DVR, or NVR.
-
Enter the device information (IP address, username, password).
-
Save the device.
Once all cameras are added, you can begin organising them.
3. Creating Camera Groups
Grouping cameras is the most effective way to manage multiple feeds.
Why Use Groups
-
Organises cameras by location (e.g., Front Yard, Lobby, Warehouse).
-
Makes live monitoring more intuitive.
-
Simplifies playback for specific areas.
Steps to Create a Group
-
Tap Menu → Device Manager → Groups.
-
Tap Add Group or Create Group.
-
Enter a group name (example: “Home Exterior”).
-
Select cameras to add to this group.
-
Save the group.
Once saved, you can view all cameras in a group together, which is especially useful if you have 10+ cameras.
4. Renaming Cameras
Clear, descriptive camera names make it easier to identify feeds quickly.
Steps to Rename
-
Go to Device Manager.
-
Tap the camera you want to rename.
-
Select Edit or Camera Settings.
-
Enter a descriptive name (e.g., “Back Door”, “Parking Lot”).
-
Save changes.
Tip: Avoid using generic names like “Camera 1” or “Cam A”—this can cause confusion in live view or playback.
5. Reordering Cameras in Live View
You can control which cameras appear in which position on the screen.
Steps
-
Go to Live View.
-
Select your preferred layout (1×1, 2×2, 3×3, 4×4).
-
Long-press a camera feed.
-
Drag it to your desired position.
This is useful if you want to prioritise certain cameras, such as entrances or high-traffic areas.
6. Using Favorites for Quick Access
Favourites allow you to quickly access critical cameras without searching through all devices.
Steps
-
Open a camera feed.
-
Tap the Star Icon (★).
-
Access your favourites from the menu anytime.
Pro Tip: Use Favourites for cameras monitoring high-security zones or sensitive areas.
7. Organizing by Device or Location
If your system includes multiple DVRs or NVRs, grouping by device prevents clutter.
Steps
-
Go to Devices → Add Device Group.
-
Create groups like “Home NVR” or “Office DVR”.
-
Place cameras under their respective device groups.
This setup ensures a clean hierarchy, making large installations easier to manage.
8. Customizing Layouts
Invid Elevate supports multiple grid layouts to view several cameras simultaneously.
Available Layouts
-
1×1 – Single camera view
-
2×2 – 4 cameras
-
3×3 – 9 cameras
-
4×4 – 16 cameras
Steps to Customize
-
Open Live View → Select a layout.
-
Assign cameras to each tile by tapping the empty slot.
-
Save the layout for future use.
Custom layouts let you monitor multiple critical areas at a glance.
9. Organizing Playback
Playback organisation is as important as live monitoring.
Steps
-
Tap Playback.
-
Choose the camera or camera group you want to review.
-
Use the timeline to select the exact time period.
-
Filter playback by camera groups for faster review.
Tip: Grouped playback is ideal for incident investigation or daily monitoring reports.
10. Advanced Tips for Camera Organization
-
Use Colour Codes: Some versions allow you to assign colours to groups for quick identification.
-
Sort by Priority: Keep critical cameras at the top of the list.
-
Regular Updates: Rename or regroup cameras if you change locations or roles.
-
Backup Settings: Export your camera setup to avoid reconfiguring after app updates.
11. Troubleshooting Camera Organization Issues
-
Cameras not appearing in groups: Ensure they are online and properly added.
-
Unable to reorder feeds: Check the app version and update if necessary.
-
Favourites not saving: Log out and log back in, or reinstall the app.
-
Playback showing wrong camera: Verify group assignments.
12. Benefits of Proper Camera Organization
-
Faster response to security events
-
Easier monitoring for multiple locations
-
Simplified playback for investigations
-
Reduced confusion in large-scale installations
-
Better control over layout and camera priority
Conclusion
Organising cameras in the Invid Elevate app transforms your monitoring experience from chaotic to highly efficient. By using groups, favourites, renaming, layouts, and device organisation, you can quickly access the cameras that matter most, customise views, and streamline both live monitoring and playback. Whether managing a home setup or a multi-location security system, these practices ensure maximum efficiency and reliability.
He is a SaaS-focused writer and the author of Xsone Consultants, sharing insights on digital transformation, cloud solutions, and the evolving SaaS landscape.